6.24.2008

Sweet and Simple

I have always wanted to make my own frozen yogurt. It's one of my favorite treats and just hits the spot every time. For Father's Day we went over to Joseph's parents house and brought along dessert. We didn't have enough time to make Angel Food cupcakes from scratch like we wanted to so we semi-homemade this recipe... (Costco sells huge Angel Food cupcakes!)

I had some left over chocolate sauce from a cake I made. The sauce was supposed to be the filling but I used it as a frosting. It's a custard based sauce and the recipe can be found in the Black & White cake in Dorie Greenspan's Baking: From my Home To Yours. I'll post the recipe tonight.

I cut up some fresh strawberries, sprinkled them with the tiniest bit of sugar and stirred them for a bit and than left them in the fridge with plastic wrap for about an hour to let the juices come out. I also made fresh whipped cream when we got over to the house... so simple: heavy whipping cream and a bit of powdered sugar!

Source: The Perfect Scoop by David Lebovitz


Vanilla Frozen Yogurt
  • 3 cups (720g) strained yogurt (see below) or Greek-style yogurt (I used full fat vanilla yogurt)
  • 3/4 cup (150g) sugar
  • 1 teaspoon vanilla extract (optional)

Mix together the yogurt, sugar, and vanilla (if using). Stir until the sugar is completely dissolved. Refrigerate 1 hour.

Freeze in your ice cream maker according to the manufacturer's instructions.

To make 1 cup (240g) of strained yogurt, line a mesh strainer with a few layers of cheese cloth. then scrape 16 ounces or 2 cups (480g) of plain whole-milk yogurt into the cheesecloth. Gather the ends and fold them over the yogurt, then refrigerate for at least 6 hours. So, for the above recipe start with and strain 6 cups of yogurt.

Makes about 1 quart. I was able to pack this into the empty yogurt carton I had.

6.21.2008

I won! Let's get blending...


You are looking at my brand spanking new blender! Amber over at Amber's Delectable Delights was giving away a blender on her blog and all we had to do to be considered was comment on her blog entry. Can you believe how easy that is? Well, I commented and told her all of the wonderful things I want to make with my blender.

Using random.org Amber chose my comment as the winner and in a week or two I had a huge box on my doorstep! I am hoping to make some tortilla soup tomorrow with it. I might just have to squeeze in enough time to play :)

Again, many thanks, Amber! This was a wonderful gift that will keep on giving time and time again.

Creamy Ring of Blah

So I winged it and things were not pretty. I tried to make a family favorite (from my mom) into a low-fat meal and it just didn't turn out right. For starters... never use fat free mayo in a mayo based dish. Not a good idea flavor wise. And make sure to follow a recipe to the T if you've never made it before :) That's all I have to say... I have posted the original recipe from my mom and my changes are in italics. I'd go with mom's recipe for a tasty, simple dinner that's great for the whole family (kids included... great way to get them to eat broccoli).

Source: My mom and Pampered Chef


Cheesy Chicken Broccoli Ring
  • 2 pkg. 8 oz. refrigerated crescent rolls I used reduced-fat
  • ½ cup chopped red bell pepper
  • ½ cup chopped fresh broccoli
  • ¼ cup drained and chopped water chestnuts Mom and I omit
  • 2 tablespoons chopped onion
  • 1 cup (4 oz) shredded Colby jack cheese Mom and I use cheddar, I used reduced-fat
  • 1 can ( 5 oz) chunk chicken, drained and flaked Mom and I use left over chicken, not canned
  • 2/3 cup canned condensed cream of chicken soup (for some reason I thought she used mayo! I used FF mayo and will be using the canned soup next time)

Preheat oven to 350 F. Unroll crescent dough; separate into triangles. Arrange triangles in circle on greased 14-inch pizza pan (I use my round stone) with wide ends overlapping in the center and points towards the outside.

In large bowl, combine bell pepper, broccoli, water chestnuts, onion, cheese, chicken and soup. Scoop mixture evenly onto the widest end of each triangle. Bring outside points of triangles down over filling and tuck under wide ends of dough at center. (Filling will not be completely covered.)

Bake 25-30 minutes or until golden brown.

Serves 6-8
WW points for Low Fat version: 6 points

6.14.2008

Spicy and Savory

My husband rarely makes a request for me to cook something specific for dinner. He is definitely a trooper when it comes to eating what I cook (even if it doesn't turn out quite as well as I'd hoped). About a year or two ago ago he asked me to make lasagna. I was so stoked! I had never made lasagna before and couldn't wait to try.

I went to the store and purchased all of the ingredients. It was super expensive because we didn't have anything on hand. I get home and settle into cooking. I have everything in the oven by the time he comes home. He comments on how good it smells but has a funny look on his face. I shake it off and so does he. 30 minutes later (yeah... lasagna takes forever to cook!) I bring dinner to the table and he goes... "That's not what I asked for!" Um... yeah, it is. I just spent how long buying all the ingredients and making this for you??? It is not the wrong dish. He just got two dishes confused.

What did he really want? Enchiladas. Go figure.

Source: Me


Beef & Olive Enchiladas
  • 5 whole wheat tortillas
  • 1/2 can enchilada sauce (I used medium)
  • 1 bag shredded Mexican cheese blend
  • 1/2 pound ground beef
  • 1/2 onion, chopped (I used 1 whole onion and reserved 1/2 for Mexican rice)
  • 2 cloves garlic, minced
  • 1/2 teaspoon chili
  • 1/4 teaspoon cumin
  • 1/4 cup sliced black olives
Preheat oven to 375 degrees. Heat up 1 teaspoon olive oil in a skillet and add onion and garlic. Cook until onion is translucent. Remove 1/2 of onion/garlic mixture and set aside. Add beef to skillet and brown. Add salt and pepper, chili and cumin. Once browned add olives.

Place some cheese on a tortilla and cover with 1/6th of the meat mixture. Add some more cheese on top of the meat mixture. Wrap up and place in oven-safe dish (I used a square 9X9 glass pan). Repeat until all tortillas are used. If there's left over meat mixture give it to your husband to polish off :)

Cover tortillas with sauce and top liberally with cheese. Place in oven and cook until cheese is melted and slightly brown (about 20 minutes).

Mexican Rice
(to be prepared while enchiladas are cooking)
  • 1 cup long grain white rice
  • 1 cup chicken broth
  • 3 tablespoons tomato paste
  • Sprinkle of salt
  • diced tomatoes (optional, I didn't use this time)
  • diced green chilies (optional, I didn't use this time)
Place all ingredients in a rice cooker and set to cook. The rice is usually finished when the enchiladas are coming out of the oven. Once done, mix, fluff and enjoy alongside the enchiladas!
1/2 cup onion/garlic mixture

I apologize but there is no WW information on this recipe because I did not skimp out on anything for the hubby's sake. Sorry :(

Party over here!

Let me start out by saying that this is definitely going to be my go-to recipe for party cakes in the future. It was light and sweet and the lemon and raspberry were a match made in heaven. I received so many compliments from my co-workers about the light, springy cake and wonderful flavors. The only downside to this whole ordeal was the actual process of baking...

I don't know why I had such a problem. Perhaps it was because I had started baking the night before I needed the cakes after a whole weekend away from home at family events. Or maybe it was because the cakes had to be good because there was no back up plan. Either way... there were issues.

The first major issue. For some reason we no longer have 8 or 9 inch rounds in the house. I don't know what happened to them or when they disappeared but there are none here! (side note - I get to go buy some from Williams-Sonoma in a few weeks! Score!) So I had to use my rectangle cake pan instead.

Than the cake batter really didn't fill the pan so I was left with about an inch of cake. So instead of three layers I ended up with two layers. I just cut the cake in half. But the cake came out of the pan no problem and was looking great.

Until I started frosting it. Talk about a melt-down moment (literally!). My bright mind decided to heat up the preserves to thin them out (like Dorie suggested) and than pour them on the cake and top it with whipped cream *before* allowing it to cool a bit! Talk about a mess. The whipped cream frosting was melting like crazy so when I went to put the top piece on it was sliding everywhere!

I got smart somewhere in between and decided to put the cake in the freezer to stiffen up before frosting. After that all was well. The frosting went on without a hitch. The chocolate shavings were easy enough and piping the edges (even though they aren't pretty) went smoothly. All in all it was worth it but I'll definitely be giving myself some more time next go around.

Source: Dorie Greenspan's Baking: From My Home To Yours


Perfect Party Cake

For the cake:
  • 2 ¼ cups cake flour
  • 1 tbsp. baking powder
  • ½ tsp. salt
  • 1 ¼ cups whole milk or buttermilk (I used buttermilk as recommended by Dorie)
  • 4 large egg whites
  • 1 ½ cups sugar
  • 2 tsp. grated lemon zest
  • 1 stick (8 tbsp.) unsalted butter, at room temperature
  • ½ tsp. lemon extract (I used the juice from 1/2 of a small squeezed lemon)
For finishing:Center a rack in the oven and preheat the oven to 350°. Butter two 9-inch round cake pans and line the bottom of each pan with a round of buttered parchment paper (I used a 9X13 rectangular pan). Dust both pans with flour, shaking out the excess. Set aside.

Sift together the flour, baking powder and salt. In a medium bowl, whisk together the milk and egg whites. In the bowl of an electric mixer, combine the sugar and lemon zest. Mix them with your fingers until the sugar is moist and fragrant (it really smells heavenly!). Add the butter to the sugar mixture and beat on medium speed for 3 minutes, until light and fluffy. Beat in the lemon extract.

Add one third of the flour mixture, continuing to beat on medium speed. Beat in half of the egg mixture, then half of the remaining dry ingredients until incorporated. Add the rest of the milk and eggs, beating until the batter is homogeneous, then add the last of the dry ingredients. Finally give the batter a good 2-minute beating to ensure that it is thoroughly mixed and well aerated. Divide the batter between the two prepared cake pans and smooth tops with a rubber spatula (or place in a rectangular 9x13). Bake for 30-35 minutes, or until the cakes are well-risen and springy to the touch – a thin knife inserted in the centers should come out clean.

Transfer the cakes to cooling racks and cool for about 5 minutes. Run a knife around the sides of the cakes, invert the cake pans to remove the cake, peel off the parchment paper, and invert once more so cakes are right side up on the cooling rack. Cool to room temperature.

Using a sharp, serrated knife and a gentle sawing motion, slice each layer horizontally in half. Place one layer on a cardboard cake round or a cake plate, cut side up (since my cake did not rise much and since I didn't use rounds I just cut the cake in half and put one half on top of the other to create only one layer). Spread the preserves on top. Cover the jam evenly with about 1/3 of the whipped cream. Place the remaining layer of the cake on top of the filling. Use the whipped cream frosting to frost the top and sides of the cake (I put the cake in the freezer for about 30 minutes to stiffen up before frosting). Top with fresh berries or white chocolate shavings.

Because of the whipped cream filling and frosting, this cake should be stored in the refrigerator. Remove from refrigerator and allow to sit at room temperature at least 30 minutes before serving.

A photo from my camera phone at work of the inside:

Spinach at it's finest!

I was home alone with nothing to eat and no meat defrosted so I went for simple. This meal was thrown together in not 1 hour, not 30 minutes, not even 15 minutes but a total of 10 minutes! This pasta dish can either be used as a side or as a main course. Meat can be added, other veggies can be added. There are unlimited options with this dish and it's oh so good!

Source: Me with help from Coconut & Lime


Spinach Spinach Pasta
  • 4 ounces spinach linguine
  • 1/2 cup spinach pesto
  • 1/2 cup diced Roma tomatoes (seeded and juiced)
  • 1 ounce grated Parmesan cheese
Cook linguine while preparing the pesto. Chop tomatoes and grate Parmesan. When linguine is done drain and toss with pesto. Serve with tomatoes either tossed in or on the side and top with grated Parmesan.

Serves 2, 6 WW points

6.08.2008

O-R-E-O!

I wanted to make some goodies for our family reunion this year and after recommending these to a girlfriend of mine I decided to play a bit with filled cupcakes. Joseph loves oreos so I thought I could play with that concept and create a cute cupcake.

I used a Williams-Sonoma recipe for Devils Food cupcakes and a frosting/filling recipe from a blogger I stumbled upon through a Google search. The cupcakes were moist and definitely tasted oreo-like. My family members couldn't get enough. The littlest ones were enjoying more than their fair share. In less than 1 minute my 3 year old cousin had his cupcake eaten (no crumbs left)! My older cousins had to quickly snatch a few for themselves.

Source: Williams-Sonoma Cakes and The Bumbling Baker


Devil's Food Cake
  • 2 1/3 cups all-purpose flour
  • 1 cup unsweetened cocoa powder, sifted
  • 1 1/2 tsp. baking powder
  • 1/2 tsp. baking soda
  • 1/2 tsp. salt
  • 12 Tbs. (1 1/2 sticks) unsalted butter, at room temperature
  • 2 cups firmly packed light brown sugar
  • 2 tsp. vanilla extract
  • 4 eggs, at room temperature
  • 1 1/2 cups buttermilk, at room temperature
Preheat an oven to 350°F. Place cupcake liners in cupcake pan.

In a large bowl, sift together the flour, cocoa powder, baking powder, baking soda and salt; set aside.

In another large bowl, using an electric mixer, beat the butter on medium speed until smooth. Gradually add the brown sugar and continue beating until fluffy. Beat in the vanilla. Add the eggs one at a time, beating well after each addition.

Reduce the speed to low and add the flour mixture in three additions, alternating with the buttermilk and beginning and ending with the flour, beating after each addition.

Divide the batter between the prepared liners. Bake until a toothpick inserted into the center of a cake comes out clean, 19 to 24 minutes. Transfer the cupcakes to a wire rack and let cool for 15 minutes. Let the cupcakes cake cool completely before filling and frosting.

Frosting/Filling
  • 1 1/4 cups whipping cream
  • 2 tbsps. icing sugar
  • 1/4 tsp. vanilla
  • 1/2 cup Oreo cookie crumbs (I omitted and just used the Oreo's to top the cupcakes)
In the bowl of an electric mixer, whip the cream, sugar and vanilla until stiff.

Gently fold in the cookie crumbs. (I omitted)

Scoop 1/2 of the mixture into a piping bag, and using a Bismarck tip, inject filling into each cupcake by sticking the tip into the middle of the cupcake and squeezing a bit. (I used my Decorator Bottles and star tip from Pampered Chef).

Frost the cupcakes with the other 1/2 of the frosting and top with 1/2 of an oreo.

A little army of cupcakes ready to take on the world:


The inside:


My cute little decorator bottle from Pampered Chef:

Just what the doctor ordered...

Joseph came home from a business trip to Denver with a fever of 100 degrees. He felt so bad that he called in sick to work the next day. Joseph doesn't call in sick... ever. So when he does you know it's serious. As I was driving home I was thinking of what I could make for dinner and remembered the chicken breast meat left over from the whole chicken I roasted earlier in the week. I hadn't yet made homemade chicken noodle soup so I decided to give it a whirl.

I started searching my recipe books for the perfect recipe and came across an old issue of Cooking Light that was handed down to me. I thought that it was perfect because it killed two birds with one stone. It would soothe my hubby and would fit with my WW lifestyle. I made my own home made egg noodles to go with it and everything was so great!

I grilled Joseph for changes, critiques and comments about the dish. It passed with flying colors! He didn't have anything to change and even enjoyed my addition of red cayenne pepper for extra heat (it opens up the sinuses too!). After really prodding for more feedback the only thing he could suggest would be to make the noodles thinner.

Source: Cooking Light October 2006 Issue


Roasted Chicken Noodle Soup
  • 2 teaspoons olive oil
  • 1 cup chopped onion
  • 1 cup diced carrots
  • 1 cup sliced celery
  • 1 garlic clove, minced
  • 1/4 cup all-purpose flour
  • 1/2 teaspoon dried oregano
  • 1/4 teaspoon dried thyme
  • 1/4 teaspoon poultry seasoning
  • 6 cups low-salt chicken broth (I used 3)
  • 4 cups diced peeled baking potato (I omitted)
  • 1 teaspoon salt
  • 2 cups diced leftover roasted chicken
  • 1 cup evaporated skim milk (I omitted)
  • 4 ounces (2 cups) uncooked wide egg noodles (I used fresh... see below for recipe)
  • Fresh thyme (optional)
Heat olive oil in a Dutch oven over medium heat. Add chopped onion, carrots, celery, and garlic clove; sauté 5 minutes.


Sprinkle flour, oregano, thyme, and poultry seasoning over vegetables, and cook 1 minute. Stir in broth, potato, and salt. Bring to a boil; reduce heat, and simmer, partially covered, 25 minutes or until potato is tender.


Add roasted chicken, milk, and noodles, and cook 10 minutes or until noodles are tender. Garnish with fresh thyme, if desired.

Makes 2 1/2 quarts or 10 cups (serving size: 1 cup)

Nutritional Information for Original Recipe: CALORIES 215(19% from fat); FAT 4.6g (sat 0.9g,mono 1.6g,poly 0.8g); PROTEIN 14.9g; CHOLESTEROL 37mg; CALCIUM 101mg; SODIUM 355mg; FIBER 2.6g; IRON 2.4mg; CARBOHYDRATE 28.6g

WW points for soup w/o noodles = 1 point per cup

Egg Noodles
Source: Allrecipes.com
  • 2 1/2 cups AP flour
  • 1 pinch salt
  • 2 eggs, beaten (I used Egg Beaters)
  • 1/2 cup milk
  • 1 tablespoon butter
In a large bowl, stir together the flour and salt. Add the beaten egg, milk, and butter. Knead dough until smooth, about 5 minutes. Let rest in a covered bowl for 10 minutes.

On a floured surface, roll out to 1/8 or 1/4 inch thickness. Cut into desired lengths and shapes.

Allow to air dry before cooking.

To cook fresh pasta, in a large pot with boiling salted water cook until al dente. (I just added directly to the soup about 10 minutes before the soup was ready)

3 WW points per serving (10 servings when included with soup)

6.02.2008

Put the lime in the coconut...

I purchased some hazelnut crusted salmon at Trader Joe's this weekend in case I got lazy one night this week... well, that night came quickly. I wanted something else to make the dish really pop but didn't know what to make. So for lunch I tuned to Robin Miller to see what she was up to (who am I kidding... I watch her every day).

She made a few really delicious meals. One of them was a rice and beans side dish for her main chicken dish. This rice and beans dish just sounded delicious! And I had all of the ingredients at home except for the coconut milk. I've never cooked with coconut milk so I was pretty excited to try it!

Source: Quick Fix Meals with Robin Miller


Coconut Lime Rice and Beans (or Jamaican Rice and Peas)
  • 2 cups instant rice (I used brown jasmine rice)
  • 1 14 ounce can coconut milk
  • 1 1/4 cup water
  • 1 15 ounce can kidney beans, drained
  • 1 teaspoon dried thyme
  • 1/2 teaspoon finely grated lime zest
  • 3 tablespoons chopped chives
  • Juice of 1/2 a lime
Throw everything but the chives and lime juice into a rice cooker and flip the switch to cook... wait for switch to go to warm. Fold in chives and season to taste with salt and pepper if desired.Squirt the juice of 1/2 a lime on top and stir.

Makes 8 servings, 7 WW points per serving (and sooo worth it!)

6.01.2008

Quick Snack

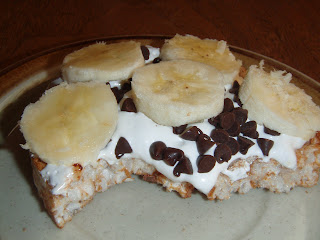
In today's WW meeting we received some coupons. In the coupon books there's always a few recipes. Sometimes they have really good ones and sometimes they have so-so ones. I always love when they have snack type recipes.

This recipe was good. But I am not sure if I'd indulge a lot because it's pretty high in points for what it is. I could have something the same size but more tasty for less points (No-Pudge Brownie with a small Albertson's ice cream sundae cup anyone?).

Source: Weight Watchers and Quaker Rice Cakes (in the WW coupon book and on the back of the chocolate peanut butter rice cake package)


Nutty Chocolate Banana
  • 1 Quaker Peanut Butter Chocolate Chip Rice Cakes
  • 1 tablespoon marshmallow crème (I used 2)
  • 4 banana slices, 1/8 inch thick, cut into pieces
  • 1/2 teaspoon chopped peanuts (I omitted)
  • 1/2 teaspoon mini chocolate chips
Spread creme over rice cake, sprinkle with chocolate chips and cover with banana slices. Enjoy!

4 WW points each (the original recipe's NI is 120/3/0 for a points value of 3)

Cooling off

After the delicious and too tempting strawberry margarita ice cream I made a few nights ago (and only blogged about today) I needed a frozen treat that wouldn't go straight to my thighs. This frosty treat is soooo good it's sure to hit the spot this summer.

I might just play on adding alcohol later on but this slushy-type sorbet was the perfect accompaniment to our grilled burgers and zucchini. Next time we grill we have to eat outside... it's just been sooo nice lately. And it's light all the way until 8pm! I love summer!

Source: Cooking Light June 2008


Lemonade Iced Tea Sorbet
  • 2 cups boiling water
  • 4 regular sized tea bags (I used the recommended English Breakfast)
  • 3/4 cup sugar
  • 3/4 cup fresh lemon juice
  • 1 cup ice water
  • mint sprigs and sliced lemon for decoration
Combine boiling water and tea bags in a large bowl; steep for 5 minutes. Discard the tea bags. Add sugar to the tea mixture, stirring until the sugar dissolves. Cool completely. Stir in juice and 1 cup ice water. Chill 1 hour.

Pour tea mixture into the freezer can of an ice-cream freezer; freeze according to manufacturer's directions. Spoon sorbet into a freezer-safe container. Cover and freeze until firm, about 1 hour. Garnish with mint sprigs and lemon if desired.

Eight 1/2 cup servings at 1 WW point each

And a picture of our delicious dinner... Ground sirloin burger, grilled onions, fresh roma tomatoes on a light english muffin with a side of grilled zucchini :)

Gooey Pizza

I thought I could make a lower point pizza at home. So I did my best to pick good, healthy things to put on my pizza and chose a low point dough to make the crust. I guess this could be low point if you didn't use fresh whole mozz but it was sooo worth it!

The pizza was pretty good and I like that I could control the toppings without paying extra :) I chose to use a mixture of things that came out pretty well when melded together. I might get a bit more crazy when I make pizza again.

Source: Me


Danielle's Chicken & Veggie Pizza
  • 1/4 of Trader Joe's herb pizza dough
  • 1/4 cup shredded chicken
  • 1/2 serving Boboli pizza sauce
  • 1 1/2 oz fresh mozzarella, torn in pieces
  • 1/4 oz fresh parmesan, shredded
  • 1/8 cup broccoli, chopped
  • 1/8 cup spinach, chopped
Preheat oven to 450 degrees and place round stoneware in oven. Let dough rest for 20 minutes on the counter. Lightly flour counter with AP flour or corn meal (I used corn meal).

Roll out into a round shape as light or thick as you want (you will change the amount of time you cook the pizza depending on the thickness of the crust). I tried to roll my crust out fairly thin because I don't like "doughy" crust and usually end up with a bit of uncooked dough if I don't roll it out thin.

Roll up the sides of the outer edge of dough if you want a crust. Spread pizza sauce on dough. Spread out toppings and cover with cheeses. Transfer pizza onto stone in the oven. Be very careful because stone will be VERY hot! And if you touch it your skin might just stick to the stone... just saying.

I find it easy to assemble the pizza on a cutting board so that I can slide the pizza on to the stone with the help of a spatula.

Cook for 8-10 minutes or until cheese is light brown in places and bubbling. Take stone out of the oven and let pizza cool for about 5 minutes. Enjoy!

1 whole pizza = 10 WW points

It's my 100th!

I've finally hit my 100th post! And what a joy its been. I am so surprised that the 100th post is totally not WW friendly :) Joseph and I received an ice cream maker from his brother some time last year and we never had a chance to play with it until now. Boy are we glad we did!

Not only is it super easy to make your own ice cream, it can be cheaper if you choose the right ingredients. My first go at ice cream was not cheaper but I was able to make it totally organic! Joseph and I have slowly started to change our buying habits and we have chosen to include more organic food and products.

This strawberry ice cream is not only extremely addicting, it's full of strawberries. So I should get points for eating more fruit, right? Haha... yeah, there are plenty of points... Next time I think I'll make the sorbet alone. Bunco anyone?

Source: Adapted from Cooking Light and Annie's Eats


Strawberry Margarita Ice Cream
  • 1 cup fresh ripe strawberries, stemmed and sliced (I diced into small bits)
  • 3 tbsp. freshly squeezed lemon juice
  • 1 cup sugar, divided
  • 1 cup whole milk
  • 2 cups heavy cream
  • 1 tsp. vanilla extract
  • 1/4 cup fresh lime juice
  • 1/4 cup tequila

Combine the strawberries with the lemon juice and 1/3 cup of sugar; stir gently and allow the strawberries to macerate in the juices for 2 hours.


In another bowl, use a hand mixer to combine the milk and granulated sugar until the sugar is dissolved. Stir in the heavy cream, the vanilla and any accumulated juices from the strawberries. Add lime and tequila and stir.


Turn on your ice cream maker and pour the mixture into the frozen bowl. Let mix until thickened, about 25-30 minutes. Add half of the sliced (or diced) strawberries during the last 5 minutes of freezing. Ice cream will be soft at this point. For a firmer ice cream, transfer to an airtight container and store in freezer until it has reached your desired consistency.


* For the strawberry sauce seen above take the other cup of strawberries and cook them in a small sauce pan over medium low until very thick and liquidy (yes, that is a word...). Strain in mesh strainer and pour over ice cream. You could add a bit more liquor to the strawberries if you'd like. I'll play with it next time I make it to see what tastes good.

If you split this into 10 servings its a whopping 7 points a serving! Yeah, this is only for special occasions... But Joseph is already asking for another batch.